
Imagine sinking your teeth into a slice of Banh Khoai Mi Nuong, a delightful Vietnamese cake that perfectly blends the natural sweetness of cassava with the rich, creamy texture of coconut milk. This traditional dessert, often enjoyed during festive gatherings and family celebrations, has a charm that transcends borders.
Originating from Vietnam, where cassava is a staple, this cake offers a unique taste experience that’s different from your usual desserts. Its simplicity in ingredients and preparation makes it a favorite among home cooks looking to bring a piece of Vietnamese culture into their kitchens.
Ingredients
Main Ingredients
- Cassava: 2 pounds, peeled and grated
- Coconut milk: 1 and 1/2 cups
- Sugar: 3/4 cup
- Tapioca starch: 2 tablespoons
- Salt: 1/4 teaspoon
- Pandan leaves: 5 leaves, washed and tied into a knot (optional for enhanced flavor)
- Sesame seeds: 1 tablespoon, toasted
- Shredded coconut: 1/4 cup, lightly toasted
- Condensed milk: for drizzling over the cake before serving (adds sweetness)
Required Equipment
Before you dive into making your own Banh Khoai Mi Nuong, ensure you have the following equipment ready. These tools are crucial for achieving the right texture and flavor that make this Vietnamese cake such a delightful treat.
Mixing Tools
- Large Mixing Bowl: This will be used to combine the cassava, coconut milk, and other ingredients thoroughly.
- Whisk or Wooden Spoon: Essential for mixing the batter to ensure it is smooth and well-combined.
Baking Equipment
- 8-inch Square Baking Pan: Perfect for achieving a traditional shape and thickness. Make sure it’s well-greased or lined with parchment paper to prevent sticking.
- Oven: Required for baking the cake. Preheat it to the recommended temperature before you begin mixing your ingredients.
Measuring Tools
- Measuring Cups and Spoons: Accuracy is key in baking, so ensure you measure your ingredients precisely.
- Grater: Needed for grating the cassava if you’re starting with a whole root.
- Brush: For greasing the pan evenly with oil or melted butter.
Preparation Steps
Diving into the preparation of Banh Khoai Mi Nuong, you’ll find the process both enjoyable and straightforward. Here, you’ll learn how to properly prepare your cassava and mix your ingredients for the perfect Vietnamese cake.
Preparing the Cassava
- Start by peeling the cassava roots thoroughly to remove all the outer skin and pinkish layer beneath as these parts are tough and not edible.
- Once peeled, wash the cassava under cold running water to ensure any dirt and residual skin are removed.
- Grate the cassava using a hand grater or a food processor equipped with a grating blade. Aim for a fine texture, which is crucial for a smooth batter.
- Squeeze the grated cassava with a cheesecloth or a fine mesh strainer to remove excess liquid. This step is key to preventing your cake from being too wet and ensuring it cooks to the right texture.
Mixing the Ingredients
- In a large mixing bowl, combine the grated, drained cassava with 1 cup of coconut milk. Stir these together until well integrated.
- Add ¾ cup of sugar and 2 tablespoons of tapioca starch to the cassava and coconut milk mixture. These ingredients help sweeten and bind the cake, respectively.
- If using, finely chop the pandan leaves and stir them into the mixture now. Pandan leaves will give your cake a distinct flavor and a subtle green hue that’s visually appealing.
- Mix all the ingredients thoroughly using a whisk or a wooden spoon until the mixture is smooth and homogenous. Ensure there are no lumps to achieve that perfect cake consistency.
Proceed to the next steps with the confidence that your cassava is perfectly prepped and your ingredients are well blended.
Baking Directions
Now that your batter is ready, it’s time to bake your Banh Khoai Mi Nuong to golden perfection. Follow these steps closely to ensure your cake comes out beautifully.
Preheat the Oven
Start by preheating your oven to 350°F (175°C). This step is crucial as a properly heated oven ensures that the cake cooks evenly. Make sure your oven rack is in the middle position, providing optimal heat distribution during baking.
Mixing and Pouring Batter
Before pouring the batter into the baking pan, give it one last stir to ensure any settled ingredients are well incorporated. Next, lightly grease your 8-inch square baking pan using a brush dipped in a little coconut oil or butter. This prevents the cake from sticking to the pan and makes it easier to remove after baking. Carefully pour the batter into the prepared pan, smoothing out the top with the back of a spoon or a spatula for an even layer.
Baking the Cake
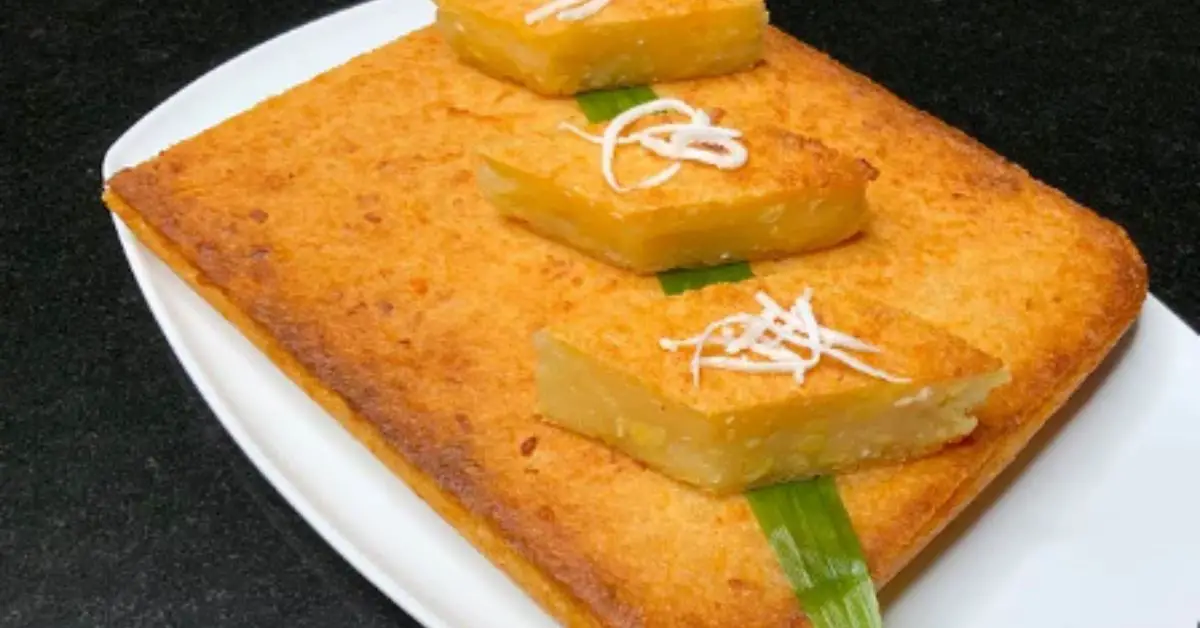
Place the baking pan in the preheated oven and bake for 50 to 60 minutes. The exact time may vary depending on your oven, so it’s good to start checking around the 50-minute mark. The cake is done when it is golden brown on top and a toothpick inserted into the center comes out clean. Once baked, remove the cake from the oven and allow it to cool in the pan for about 10 minutes. After it has cooled slightly, transfer it to a wire rack to cool completely. This cooling time helps the cake to set properly, making it easier to slice. Serve your Banh Khoai Mi Nuong slightly warm or at room temperature, garnished with toasted sesame seeds, shredded coconut, and a drizzle of condensed milk, if desired.
Cooling and Serving
After baking your Banh Khoai Mi Nuong to a perfect golden brown, the next crucial steps are cooling it properly and serving it with style.
Cooling Down
Once your cake is out of the oven, resist the temptation to cut into it immediately. Place the pan on a wire rack and let it cool for at least 30 minutes. This step is essential as it allows the cake to set, making it easier to slice without crumbling. The cooling period also enhances the flavors, melding the rich coconut milk and sweet cassava together beautifully. If you’re in a rush, you can speed up the process a bit by placing it in a cooler area or near an open window.
Slicing and Plating
When your Banh Khoai Mi Nuong is adequately cooled, run a knife along the edge of the pan to loosen the cake. If you’ve used a springform pan, simply unlock and remove the sides. Using a sharp knife, slice the cake into even pieces—either squares or rectangles based on your preference.
For serving, place each piece on a dessert plate. To elevate the presentation, sprinkle each slice with a bit of toasted sesame seeds and a generous amount of shredded coconut. A drizzle of condensed milk over the top adds a delightful sweetness and makes for a visually appealing dish. Serve the slices either warm or at room temperature to enjoy the full spectrum of flavors and textures. Whether for a special occasion or a casual dessert, these final touches will impress your guests and make the most of your baking efforts.
Storage Tips
After savoring the warm, delightful flavors of your freshly made Banh Khoai Mi Nuong, proper storage is essential to maintain its quality and extend its shelf life. Here’s how to keep your cake delicious for later enjoyment.
Cooling Before Storage
Ensure the Banh Khoai Mi Nuong is completely cool before you store it. Placing a hot or warm cake into a storage container can lead to condensation, which might make the cake soggy. Allow the cake to cool on a wire rack for about one to two hours until it reaches room temperature.
Refrigerating Your Cake
To keep the Banh Khoai Mi Nuong fresh, wrap it tightly in plastic wrap or aluminum foil. This helps to prevent it from absorbing odors from other foods in your refrigerator. For best results, place the wrapped cake in an airtight container and refrigerate. Properly stored, the cake can last up to five days in the refrigerator.
Freezing for Longer Storage
If you plan to keep the Banh Khoai Mi Nuong for more than a week, freezing is an excellent option. First, wrap the cake slices individually in plastic wrap, and then again with foil. Alternatively, you can place them in a single layer on a baking sheet to freeze them before transferring to a freezer-safe bag. This method prevents the slices from sticking together and makes it easier to thaw only the amount you need. Label the bag with the date, and the cake will be good for up to three months in the freezer.
Thawing and Reheating
When you are ready to enjoy your frozen Banh Khoai Mi Nuong again, allow the cake slices to thaw overnight in the refrigerator. To restore the cake’s warm, comforting texture, reheat it gently in the microwave or cover it with foil and warm it in the oven at 300°F for about 10-15 minutes. This will help revive the cake’s moist texture and bring back that freshly-baked taste.
Following these storage tips, you can extend the enjoyment of your Banh Khoai Mi Nuong without sacrificing its quality or flavor. Whether served warm or enjoyed as a cool treat, this cake continues to be a delightful testament to Vietnamese culinary tradition.
Conclusion
Ready to dive into the rich flavors of Banh Khoai Mi Nuong? With your newfound knowledge you’re all set to bring this delightful Vietnamese treat into your kitchen. Remember it’s not just about following the steps but also embracing the cultural essence that makes this cake special. So go ahead bake share and relish the sweet taste of tradition right from your oven. Whether you’re serving it fresh or savoring it days later each bite is a testament to the timeless charm of Vietnamese cuisine. Enjoy every slice and let the flavors tell their story!
Related Posts:
