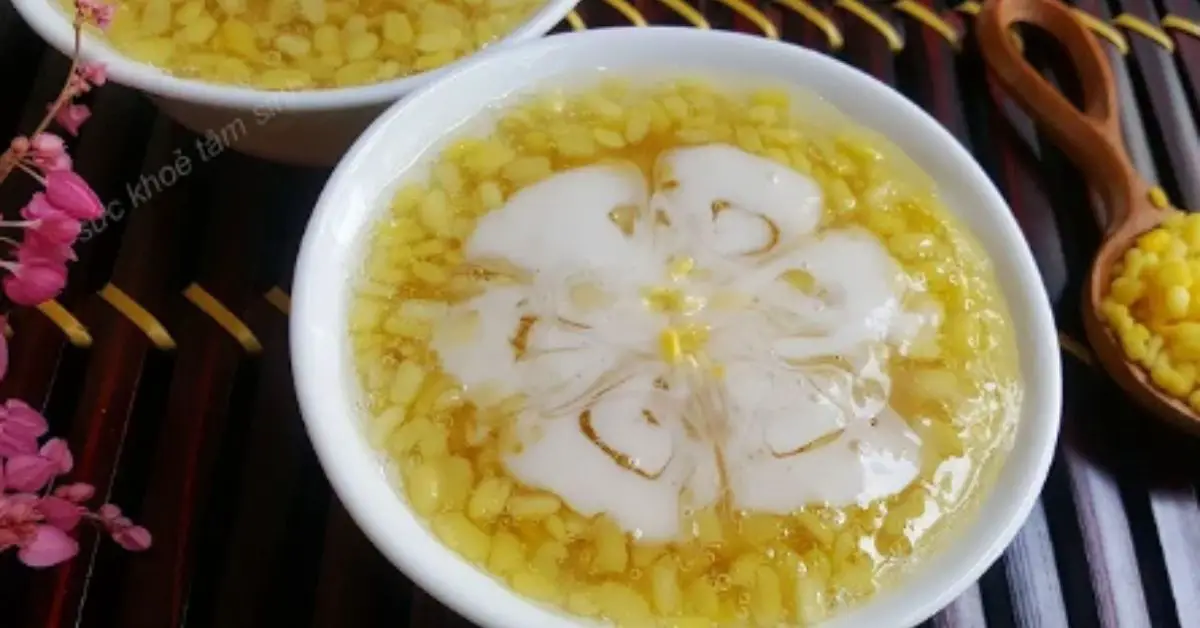
Imagine diving into a bowl of chè hoa cau, a delightful Vietnamese dessert that’s as intriguing as it is sweet. This traditional treat, often enjoyed during festive celebrations or as a cooling snack on warm days, combines the delicate flavors of coconut milk with the unique texture of agar agar jelly. It’s not just a dessert; it’s a piece of Vietnamese culture served in a bowl.
Ingredients
In crafting the delightful chè hoa cau, you’ll begin with a selection of main ingredients to create the core texture and flavor, followed by an assortment of toppings and sweeteners to enrich the overall taste.
Main Ingredients
- 1 cup of agar agar powder
- 4 cups of water
- 2 cups of coconut milk
- 1/2 cup of sugar
- 1/4 teaspoon of salt
- 1/2 cup of mung beans, peeled and soaked in water for 4 hours
- Crushed ice, for serving
- 1/4 cup of roasted peanuts, crushed
- Additional sugar or honey, to taste
- Fresh coconut shavings, for garnish
Tools and Equipment Needed
Preparing Chè Hoa Cau, a delectable Vietnamese dessert, involves a few essential tools and equipment that you’ll need to have ready before you start cooking. Below is a list of items that will help you make this delightful treat with precision and ease.
Essential Cooking Tools
- Medium Saucepan: Needed for boiling the mung beans and preparing the agar agar jelly.
- Mixing Bowls: Have a few on hand for separating ingredients and mixing them at different stages.
- Measuring Cups and Spoons: These will ensure you use the exact amounts to achieve the perfect flavor and texture.
- Whisk or Wooden Spoon: Essential for stirring the mixture, ensuring that the sugar dissolves properly and that the coconut milk blends smoothly with other ingredients.
- Fine Mesh Strainer: Useful for rinsing the mung beans and ensuring the jelly mixture is smooth without any lumps.
- Serving Glasses or Bowls: Choose attractive serving glasses or bowls to enhance the visual appeal of Chè Hoa Cau.
- Agar Agar Jelly Molds: If you want to give your jelly a decorative shape, these molds will be necessary.
- Ice Shaver or Blender: Needed to create finely crushed ice, which is a key component for serving Chè Hoa Cau.
Before you begin your dessert making, ensure all these items are clean and ready to use. Having everything prepared and within reach will streamline your cooking process and enhance your enjoyment as you prepare this delightful Vietnamese specialty.
Preparations Before Cooking
Before you dive into making chè hoa cau, get everything set up and ready. This will make your cooking process smoother and more enjoyable.
Washing and Soaking the Ingredients
Start by thoroughly washing the mung beans under cold running water. Make sure to remove any dirt or impurities. Once clean, soak the mung beans in a bowl of water for about four hours. This soaking step is crucial as it softens the beans, ensuring they cook evenly and blend well into a creamy texture once boiled.
Next, prepare the agar agar. If you’re using agar agar powder, there’s no need to wash it, but ensure it’s free from any lumps. For agar agar strips, rinse them under cold water to get rid of any dust or particles, then soak them in warm water for about 60 minutes until they soften. This preparation step is key for achieving the perfect jelly-like consistency in your dessert.
Preparing Toppings and Flavorings
While the beans and agar agar are soaking, turn your attention to the toppings. If you’re using roasted peanuts, crush them coarsely using a mortar and pestle or a rolling pin. This will add a delightful crunch to your chè hoa cau.
Prepare the coconut milk by ensuring it’s well-mixed and smooth. If the coconut milk has separated or solidified, gently heat it in a microwave or on the stovetop, stirring constantly until it becomes creamy and uniform again.
Additionally, if you plan to use fresh fruits as toppings, such as jackfruit or bananas, slice them into small, bite-sized pieces. Soak these in a light saltwater solution for about 10 minutes to prevent browning, then drain thoroughly.
By preparing each component in advance, you not only streamline your cooking process but also enhance the overall flavor and texture of your chè hoa cau, making it a truly delightful dessert.
Cooking Instructions
Now that you have prepped your ingredients, let’s dive into the actual cooking part of the chè hoa cau, ensuring every step enhances its exotic flavors and texture.
Making the Che Hoa Cau Base
First, take your pre-soaked mung beans and drain them thoroughly. Transfer them to a medium pot and pour in about 3 cups of water, ensuring the beans are well-covered. Bring the water to a boil over high heat, then reduce the heat to maintain a gentle simmer. Cook the beans uncovered for about 20 minutes, or until they are tender and fully cooked through. Most of the water should be absorbed or evaporated by now.
While the mung beans are cooking, prepare the coconut mixture. In a separate pot, whisk together 2 cups of coconut milk, 1/4 cup of sugar, and a pinch of salt over medium heat. Keep stirring until the sugar is completely dissolved and the mixture is well combined. Do not bring it to a boil to prevent the coconut milk from separating. Once done, turn off the heat.
Once the mung beans are cooked, drain any excess liquid and add them to the coconut milk mixture. Stir gently to mix everything evenly. Now, add 1/2 cup of diced agar agar jelly to the pot. Stir the mixture gently once more to distribute the jelly evenly throughout the base. Keep this base warm over very low heat while you prepare the tapioca pearls.
Cooking Tapioca Pearls
Fill a medium pot with water and bring it to a boil. You will need enough water to allow the tapioca pearls to float freely, about 4 to 5 cups. When the water is boiling, add 1 cup of small tapioca pearls and stir gently to prevent them from sticking to each other or the bottom of the pot.
Allow the pearls to cook, stirring occasionally, until they are completely translucent and have a chewy texture, about 15 minutes. Make sure to check the texture by tasting a pearl; it should be chewy but not hard in the center.
Once the tapioca pearls are cooked, drain them in a colander and rinse under cold water to stop the cooking process and remove any excess starch. This also helps in keeping the pearls separate and not sticky.
Add the rinsed tapioca pearls to the warm chè hoa cau base. Stir gently to combine all the ingredients. The texture contrast between the creamy mung beans and coconut, the soft agar agar, and the chewy tapioca pearls will highlight the unique character of this delightful Vietnamese dessert. Keep the dessert warm until ready to serve adorned with your previously prepared toppings such as crushed peanuts and sliced fruits.
Assembling Che Hoa Cau
Now that you have prepared all the ingredients, it’s time to assemble the Che Hoa Cau. This is a delightful stage where the texture and flavors of this traditional Vietnamese dessert really come together.
Layering the Ingredients
Begin by taking a clear serving glass or bowl to create a beautiful visual stack. First, add a layer of the softened tapioca pearls at the bottom, ensuring they form an even base. This will give a lovely chewy texture as you scoop through. Next, carefully spoon the mung bean mixture over the pearls. Spread the mung beans evenly to form a substantial middle layer — the creamy heart of the dessert.
Pour the thickened coconut milk over the mung bean layer. The coconut milk should flow smoothly around and between the layers, filling the glass with its sweet, rich flavor. Do this gently to keep the layers distinct. The visual contrast between the white coconut milk, the yellow mung beans, and the translucent pearls provides an appetizing appearance.
Adding Ice and Toppings
After the coconut milk, it’s time to cool the dessert down and enhance its taste with ice and toppings. Start by adding a generous amount of crushed ice over the coconut milk layer. This not only chills the dessert but also helps to meld the flavors together tantalizingly as it slowly melts.
Following the ice, sprinkle a layer of toasted sesame seeds or chopped peanuts for a delightful crunch. If you’ve prepared any additional toppings like cubes of agar agar or fresh fruit, arrange these on top artistically. These not only add a burst of flavor but also enhance the dessert’s visual appeal, making it irresistible.
Finally, use a long spoon to gently mix at the table or serve as is, allowing your guests the joy of discovering each layer by themselves. This assembly ensures that every bite is infused with creamy, chewy, and crunchy textures that make Che Hoa Cau a truly special treat.
Serving Suggestions
After you’ve successfully layered your Chè Hoa Cau with its delightful mix of textures and flavors, the next step is to turn this traditional dessert into an eye-catching presentation that resonates with the joy of dining. Serving this dish beautifully not only enhances its appeal but also elevates the overall eating experience.
- Individual Servings: Serve Chè Hoa Cau in individual clear glasses or bowls. This way, your guests can see the beautiful layers of tapioca pearls, mung bean mixture, and coconut milk. It’s a visual feast that promises something special before the first spoonful is even enjoyed.
- Garnishing: To top off your dessert, consider a sprinkle of toasted sesame seeds or chopped peanuts. These toppings not only add a pleasant crunch but also a nutty flavor that complements the sweetness of the dish. A sprig of mint or a few edible flowers can add a pop of color and a fresh aroma, making it visually stunning.
- Accompaniments: Pair Chè Hoa Cau with other Vietnamese treats or a simple cup of green tea to cleanse the palate between bites. This pairing will enhance the flavors and make for a full dessert experience.
- Seasonal Adaptations: Depending on the season, you can adapt your toppings to include seasonal fruits. Pieces of mango, durian, or lychee during their peak season can infuse a fresh twist to the traditional recipe.
Conclusion
Now that you’ve explored the intricate layers and cultural depth of chè hoa cau, why not bring this exquisite dessert into your own kitchen? Embrace the art of Vietnamese cooking and treat your guests to a visually appealing and deliciously complex dish. Remember to play around with the suggested seasonal fruits for a personalized touch that suits any occasion. Whether you’re looking to impress at a dinner party or just indulge in a sweet treat, this traditional dessert is sure to delight. Enjoy the process and savor the results—your chè hoa cau is bound to be a showstopper!
Related Posts:
