
Diving into the heart of Vietnamese cuisine, we’ve discovered a gem that’s a must-try for any food enthusiast: Cha Gio, or as many know it, Vietnamese spring rolls. These crispy delights are not just a dish; they’re a celebration of flavors and textures, wrapped in a golden, crunchy exterior. They’ve journeyed from the bustling streets of Vietnam right into our kitchen, and we’re thrilled to share this culinary adventure with you.
Making Cha Gio is an art form, blending tradition with the simple joy of cooking. We’ve experimented, tasted, and perfected this recipe, ensuring it captures the essence of Vietnam in every bite. Whether you’re a seasoned chef or a curious cook, we promise this journey into Vietnamese cooking will add an exciting twist to your culinary repertoire. Let’s embark on this flavorful voyage together, shall we?
Ingredients
Now that we’ve set the stage for the delightful journey of crafting Cha Gio, let’s delve into the essential ingredients that make these Vietnamese spring rolls a true culinary masterpiece. Gather these items to embark on creating a dish that bursts with flavors and textures, embodying the essence of Vietnamese cuisine.
For the Filling
- 1/2 pound of ground pork
- 1/4 pound of shrimp, peeled, deveined, and finely chopped
- 1 carrot, grated
- 1 onion, finely chopped
- 2 garlic cloves, minced
- 1/2 cup of glass noodles (also known as cellophane noodles or bean thread noodles), soaked in hot water for 10 minutes then finely chopped
- 1/4 cup of wood ear mushrooms, soaked in warm water for 20 minutes then finely chopped
- 2 tablespoons of fish sauce
- 1 tablespoon of sugar
- 1/2 teaspoon of black pepper
- 1 egg, beaten
- 3 tablespoons of chopped cilantro
We ensure each ingredient blends perfectly to create a fusion of taste and texture that’s both traditional and tantalizing. Preparing these components sets the foundation for our Cha Gio’s flavorful and aromatic journey.
For the Wrapping
- 1 package of Vietnamese rice paper wrappers (approximately 25 sheets)
- Water for dipping the rice paper
Choosing the right rice paper wrappers is crucial for achieving that perfect golden crispiness. We gently dip each wrapper in water to make it pliable for wrapping, ensuring a seamless enveloping of the sumptuous filling.
- 3 tablespoons of fish sauce
- 2 tablespoons of rice vinegar
- 1 tablespoon of sugar
- 1/2 cup of water
- 1 garlic clove, minced
- 1 red chili, thinly sliced (optional for heat)
- 2 tablespoons of lime juice
- 1 tablespoon of finely shredded carrot for garnish
The dipping sauce is where we tie all the elements together, balancing sweet, savory, and tangy notes to complement the crispy, flavorful rolls. It’s the perfect finishing touch that elevates the Cha Gio, making each bite an unforgettable experience.
Tools and Equipment Needed
Embarking on the journey of making Cha Gio, it’s essential to have the right tools and equipment at your disposal to ensure the cooking process is as enjoyable as the eating part. Let’s get you set up with everything you’ll need to craft these delicious rolls.
Mixing Bowls
First up, you’ll need a set of mixing bowls. You’ll use these to combine your Cha Gio filling ingredients thoroughly. It’s beneficial to have a few sizes on hand, as this allows you to mix your ingredients without overcrowding the bowl, ensuring each piece of ground pork, shrimp, and vegetable is perfectly seasoned.
Measuring Cups and Spoons
Accuracy is key in achieving the harmonious balance of flavors characteristic of Vietnamese cuisine. Measuring cups and spoons will help you follow the recipe precisely, ensuring each roll is as delightful as the last.
A Sharp Knife and Cutting Board
A sharp knife is crucial for finely chopping your vegetables, herbs, and shrimp. A sturdy cutting board not only provides a safe surface to cut on but also helps you keep your ingredients organized.
Rice Paper Wrapper Wetting Station
Cha Gio isn’t Cha Gio without its signature crispy exterior. Setting up a station with a shallow dish of water will allow you to wet the rice paper wrappers just enough that they become pliable without tearing. This step is crucial in achieving the perfect wrap.
Frying Pan or Skillet
A high-quality frying pan or skillet is key for frying the Cha Gio to golden perfection. The ideal pan will distribute heat evenly, preventing hot spots that could burn your rolls.
Tongs
When it’s time to fry, tongs will become your best friend. They allow you to gently place the Cha Gio into the hot oil and remove them safely and efficiently once they’re cooked to a crispy, golden brown.
Paper Towels
Have a plate lined with paper towels ready to go for when those beautifully fried Cha Gio come out of the pan. They will help absorb any excess oil, ensuring your rolls are not overly greasy but just perfectly crisp.
Make-Ahead Instructions
Preparing Cha Gio, the beloved Vietnamese spring rolls, can be a delightful way to immerse oneself in the vibrant tapestry of Vietnamese cuisine. However, we understand that the prep work might seem daunting for those with a bustling schedule. Fret not, for we have some make-ahead tips that ensure your cooking experience remains joyful and stress-free.
Assembly Ahead of Time
One of the best parts about making Cha Gio is that you can assemble them ahead of time. Here’s how:
- Follow the filling recipe just as you would if you were going to cook them immediately. Make sure the filling is thoroughly mixed to evenly distribute the flavors among the ground pork, chopped shrimp, and vegetables.
- Carefully wrap the filling in the rice paper wrappers, following the traditional rolling method to secure the filling inside.
- Once you have all your rolls assembled, place them in a single layer on a tray lined with parchment paper. Ensure they are not touching, as they can stick together.
- Cover the tray with plastic wrap and refrigerate for up to 24 hours before you plan to fry them.
Freezing for Future Feasts
For those who love to plan ahead, Cha Gio freezes beautifully:
- After assembling the rolls, instead of refrigerating, freeze them on the tray until they are solid. This step prevents them from sticking together.
- Once frozen, transfer the rolls into a freezer-friendly bag or container. They can be stored in the freezer for up to three months.
- When you’re ready to enjoy, there’s no need to thaw—simply fry the frozen Cha Gio in hot oil until they are golden brown and crispy. Adjust cooking times accordingly, as frozen rolls might take a bit longer to cook thoroughly.
Sauce Preparation
The dipping sauce, a quintessential component of enjoying Cha Gio, can also be prepared in advance:
- Combine all ingredients for the sauce—typically, this includes fish sauce, water, sugar, lime juice, garlic, and chili—stirring until the sugar dissolves.
- Store the sauce in an airtight container in the refrigerator. It stays fresh for up to a week, allowing you to enjoy the nuanced flavors of Vietnamese cuisine whenever the craving strikes.
Preparing the Filling
Embarking on the journey of making Cha Gio, the heart of these delectable Vietnamese spring rolls lies in their rich and flavorful filling. Here’s how we prepare the perfect blend of ingredients to ensure each bite is a burst of flavor.
Mixing the Ingredients
To start, gather the following ingredients in a large mixing bowl:
- 1 lb ground pork
- 1/2 lb shrimp, peeled, deveined, and finely chopped
- 1 cup shredded carrots
- 1/2 cup finely chopped shallots
- 1/4 cup finely chopped wood ear mushrooms (soaked in water for 20 minutes and drained)
- 2 tablespoons finely chopped garlic
- 2 oz cellophane noodles (soaked in warm water for 20 minutes and then finely cut)
- 2 tablespoons fish sauce
- 1 tablespoon sugar
- 1/2 teaspoon ground black pepper
- 1 egg, lightly beaten
First, ensure the cellophane noodles and wood ear mushrooms are well-prepped according to the instructions. In a large mixing bowl, combine the ground pork and chopped shrimp with the shredded carrots, chopped shallots, wood ear mushrooms, and garlic. Add the softened and cut cellophane noodles to the mix. The noodles and mushrooms add not just flavor but also a delightful texture contrast to the filling.
Pour in the fish sauce and sprinkle the sugar and ground black pepper over the mixture. These ingredients infuse the filling with a deep, savory umami and a hint of sweetness that is characteristic of many Vietnamese dishes. Lastly, fold in the beaten egg into the mixture. The egg acts as a binding agent, ensuring the filling holds together beautifully as the Cha Gio cooks to perfection.
Using your hands or a spatula, mix the ingredients thoroughly until well combined. The goal here is to ensure that the flavors meld together, with each ingredient contributing to the overall taste profile of the filling.
Seasoning Adjustments
Taste is subjective, and achieving the perfect balance of flavors is crucial for the filling of Cha Gio. After mixing the ingredients, it’s important to adjust the seasoning to your preference. Take a small spoonful of the mixture and cook it in a pan over medium heat. Sample this cooked piece to evaluate if adjustments are needed.
If the filling tastes too bland, consider adding a bit more fish sauce for saltiness or a pinch of sugar for sweetness. Both these condiments play a significant role in Vietnamese cuisine, offering a complex flavor profile that’s both deep and poignant. If the mixture needs a kick, a dash more of ground black pepper can do wonders.
Remember, the filling should have a pronounced savory flavor with a hint of sweetness and a subtle kick of black pepper. Adjusting the seasonings at this stage ensures every roll is packed with taste and pairs wonderfully with the dipping sauce we previously prepared.
Wrapping the Cha Gio
After preparing the flavorful filling and mixing it to achieve the perfect balance of savory, sweet, and peppery notes, we now move to an exciting part of the process: wrapping the Cha Gio. It’s where the magic happens, transforming the mixture into delightful rolls ready for frying.
Setting Up Your Wrapping Station
Before we start wrapping, setting up an efficient station is crucial for a smooth process. You’ll need a clean, dry surface, usually a cutting board or a large plate, where you’ll wrap the rolls. Place your bowl of filling, a small bowl of water, and your rice paper wrappers within easy reach. The water is used to moisten the rice paper, making it pliable and easier to work with. Ensure you have enough space to work comfortably, as you’ll be assembling several rolls.
Rolling Techniques
To wrap your Cha Gio like a pro, follow these steps for the best technique:
- Soften the Rice Paper: Quickly dip a rice paper wrapper into the water. It should be moist but not too wet. Lay it flat on your work surface.
- Add the Filling: Spoon about 2 tablespoons of the filling onto the lower third of the wrapper. Don’t overfill, or it will be difficult to wrap tightly.
- Roll Tightly: Fold the bottom edge over the filling, then fold in the sides. Roll it up firmly but gently, as you would a burrito. The rice paper is sticky, so it will seal itself.
- Ensure a Secure Wrap: The final roll should be tight and secure, with the seams neatly tucked in. This prevents any filling from leaking out during frying and ensures even, crispy Cha Gio.
Repeat the process with the remaining wrappers and filling. It might take a few tries to get the hang of it, but soon you’ll be wrapping Cha Gio like a seasoned pro. Each roll should be uniform in size and shape, which not only makes them cook evenly but also presents beautifully on the serving plate.
Cooking the Cha Gio
Now that we’ve expertly wrapped our Cha Gio, achieving that perfect balance of filling and tightness, it’s time to cook these savory morsels. Whether you’re a fan of the classic frying method or looking for a healthier alternative through baking, we’ve got you covered with step-by-step instructions.
Frying Method
Frying is the traditional method that gives Cha Gio their signature crispy shell and juicy filling. Here’s how we do it:
- Fill a deep frying pan or a wok with vegetable oil, about 1 to 2 inches deep. Heat the oil over medium-high heat to approximately 350°F (175°C). If you don’t have a thermometer, you can test the oil by inserting a wooden chopstick; if bubbles form around the chopstick, the oil is ready.
- Carefully place the Cha Gio in the hot oil. Do not overcrowd the pan, as this will lower the oil’s temperature and result in less crispy rolls.
- Fry the Cha Gio, turning occasionally, until they’re golden brown and crispy. This usually takes about 5 to 7 minutes, depending on their size.
- Remove the Cha Gio with a slotted spoon and drain them on paper towels to remove excess oil.
Enjoy the delightful crunch and aromatic filling with each bite, making the frying effort absolutely worth it!
Baking Method
For those who prefer a lighter version, baking Cha Gio is a fantastic alternative, offering a healthier, yet equally tasty experience. Here’s how to bake them:
- Preheat your oven to 400°F (200°C). Line a baking sheet with parchment paper to prevent sticking and ensure easy cleanup.
- Lightly brush each roll with a thin layer of vegetable oil or a spray of cooking oil. This helps achieve a golden color and a crisp texture.
- Arrange the Cha Gio on the baking sheet in a single layer, ensuring they’re not touching to allow for even airflow and crispiness.
- Bake in the preheated oven for about 20 to 25 minutes, or until they are golden brown and crispy. Halfway through the cooking time, flip the Cha Gio to ensure even browning.
This method yields a delightful crispness and a flavorful interior, making it a guilt-free pleasure that doesn’t compromise on taste or texture.
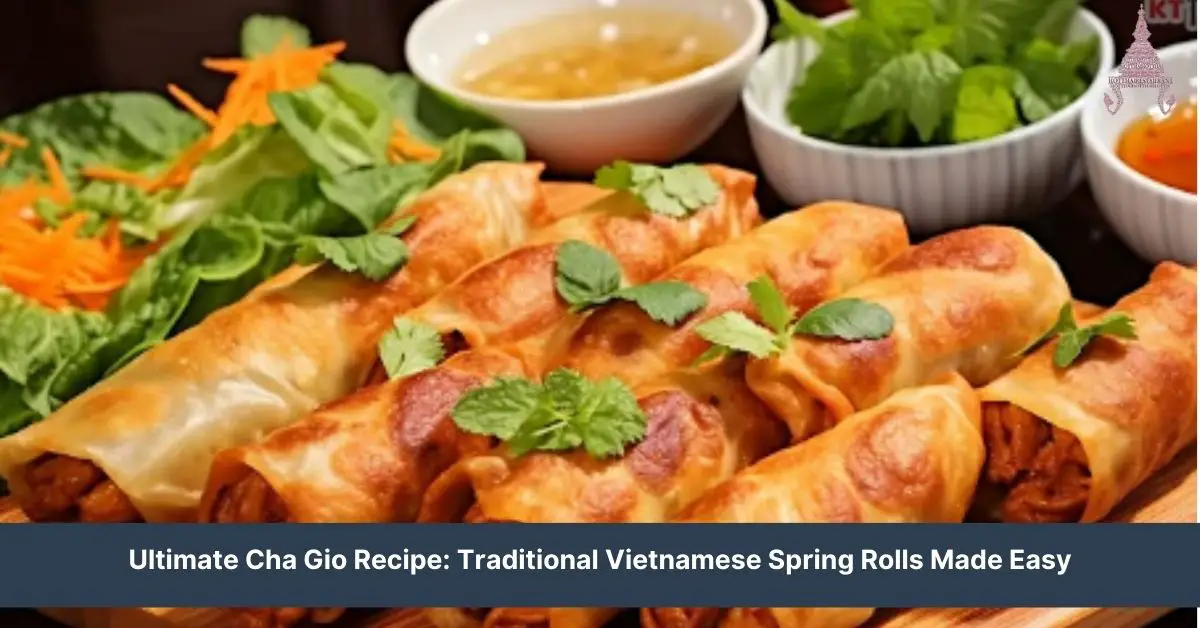
Serving Suggestions
After meticulously crafting your Cha Gio, choosing the right serving suggestions will elevate this delightful dish, ensuring a truly authentic Vietnamese dining experience.
Accompaniments
To complement the crispy texture and flavorful filling of Cha Gio, we recommend serving them with a variety of fresh herbs and vegetables. A platter of lettuce leaves, mint, cilantro, and sliced cucumber offers a refreshing contrast to the savory rolls. These greens not only add a burst of color but also allow guests to wrap their spring rolls, adding an interactive and enjoyable element to the meal.
For those who enjoy an extra kick of flavor, a side of pickled carrots and daikon radish can provide a tangy and slightly sweet accompaniment. These pickles are not just about flavor; their bright colors make them a visually appealing addition to your serving platter.
Plating
Presentation is key when serving Cha Gio. Arrange the crispy rolls on a large platter, with the fresh herbs, vegetables, and pickles on the side, allowing guests to create their perfect bite. Don’t forget to place a bowl of the homemade dipping sauce centrally on the table for easy access. This not only makes for a stunning display but also invites guests to dive into the world of Vietnamese flavors.
For individual servings, consider placing two to three Cha Gio on a bed of lettuce, garnish with a sprinkle of freshly chopped herbs, and serve with a small bowl of dipping sauce on the side. This elegant presentation highlights the golden brown color of the Cha Gio, making them irresistible.
Storage and Reheating Tips
After savoring the vibrant flavors of Cha Gio, you might find yourself with a few delightful leftovers. Don’t let them go to waste! We’ve got some easy-to-follow tips to ensure your Vietnamese spring rolls remain just as tempting the next day.
Storing Leftovers
- Cool Down: Allow the Cha Gio to cool to room temperature after cooking. This prevents condensation inside the storage container, which could make the rolls soggy.
- Refrigeration: Place them in an airtight container. If you’re stacking them, separate each layer with parchment paper to prevent sticking.
- Freezing for Longer Storage: Freeze them on a baking sheet until hard. Then, transfer to a freezer bag or airtight container. This method prevents them from sticking together and allows you to enjoy them for up to 3 months.
Reheating to Perfection
To recapture the magic of fresh Cha Gio, we recommend the following reheating methods:
- Oven Method:
- Preheat your oven to 375°F (190°C).
- Place the Cha Gio on a wire rack over a baking sheet to allow air circulation for even crisping.
- Heat for about 10-15 minutes if refrigerated or 20-25 minutes from frozen. No need to thaw!
2. Air Fryer Reheating:
- This method works wonders for achieving that freshly fried texture. Set your air fryer to 350°F (175°C).
- For refrigerated rolls, cook for about 4-5 minutes. For frozen, 8-10 minutes should do the trick.
3. Avoid Microwaving:
- While tempting, using a microwave can turn them soggy. We suggest sticking to the oven or air fryer for best results.
Conclusion
We’ve walked through the delightful journey of making Cha Gio, from selecting the right ingredients to mastering the cooking techniques that ensure a crispy, flavorful bite every time. Remember, whether you’re serving them fresh off the stove or reheating leftovers, the essence of a great Cha Gio lies in its texture and the harmony of flavors within. Don’t forget to pair them with the vibrant accompaniments we’ve talked about for that authentic touch. So go ahead, give it a try and let the rich tastes of Vietnam transform your dining table into a feast of senses. Here’s to many more delicious meals shared with loved ones, cheers!
Related Posts:
- Ultimate Banh It Ram Recipe: A Guide to Perfect Texture & Flavor
- Easy Bánh Nậm Recipe: Prep, Store & Reheat Tips for Authentic Flavors
- Easy Banh Bot Loc Tran Recipe: From Scratch to Serving
- Ultimate Bánh Bao Recipe: Cook, Store & Reheat Tips
- Ultimate Bê Thui Recipe: Enjoy & Preserve Vietnam’s Veal Delicacy
- Easy Bun Dau Mam Tom Recipe: A Guide to Authentic Vietnamese Cuisine
- Ultimate Cha Oc Recipe: From Prep to Plating Guide
- Ultimate Chao Ca Recipe Guide: Prep, Serve, and Store Like a Pro
- Ultimate Cha Gio Recipe: Traditional Vietnamese Spring Rolls Made Easy
- Ultimate Pho Sate Recipe: Bold Flavors & Easy Instructions
- Ultimate Guide to Viet Hot Pot: From Preparation to Variations
- Ultimate Guide to Vietnamese Winter Melon Soup: Cooking & Storage Tips
- Mi Xao Bo Toi: The Ultimate Guide to Vietnamese Stir-Fried Noodles
- Authentic Mi Quang Recipe: A Guide to Vietnamese Noodle Delight
- Chim Cut Roti: Ultimate Guide to Making Vietnamese Roasted Quail
- Ultimate Guide to Com Chay Chien Gion: Recipe & Tips for Crispy Rice Cakes
- Authentic Pha Lau Recipe & Tips for Storing Leftovers
- Xoi Chien Gion: Ultimate Guide to Crispy Vietnamese Rice Balls & Sauce