
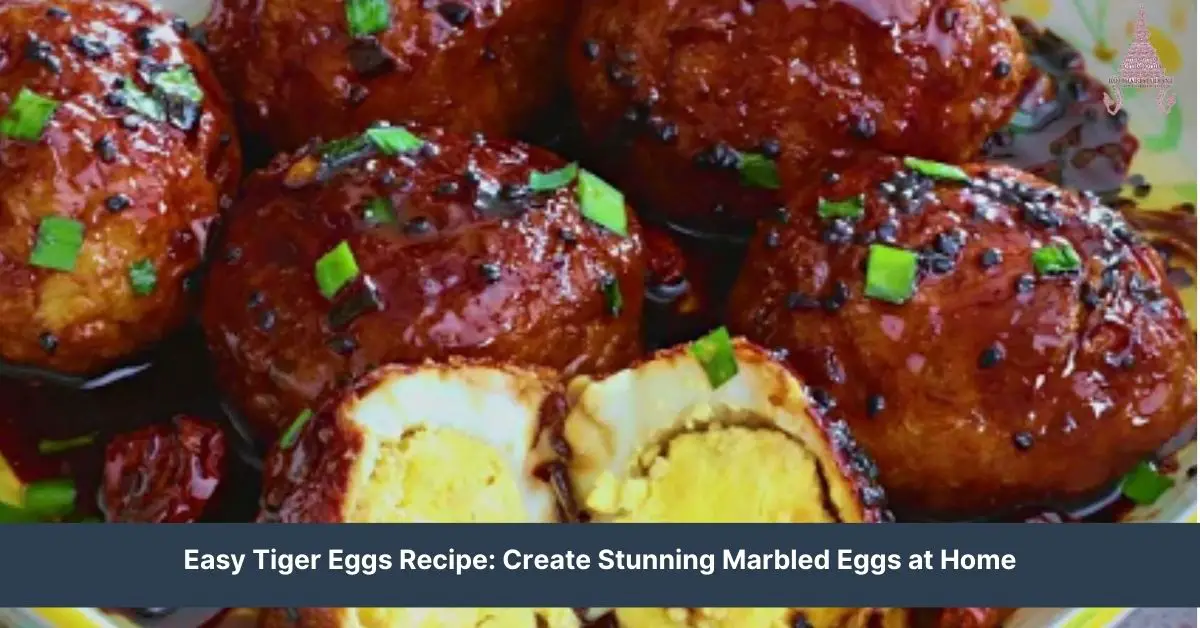
We’ve stumbled upon a dish that not only tickles the taste buds but also catches the eye with its unique appearance: Tiger Eggs. This intriguing dish, with its marbled, striated patterns resembling a tiger’s coat, transforms ordinary boiled eggs into a culinary work of art. Originating from a creative twist on traditional egg recipes, Tiger Eggs have quickly become a favorite for their visual appeal and delicious taste.
Ingredients
Continuing from the exciting introduction to Tiger Eggs, let’s dive into the specifics of what we’ll need to bring this visually captivating dish to life. Tiger Eggs not only boast an eye-catching appearance but also promise a delightful flavor profile.
Tiger Eggs Components
- 6 large eggs, room temperature
- 2 tablespoons black tea leaves
- 2 tablespoons soy sauce
- 1 tablespoon dark soy sauce (for a richer color)
- 1 teaspoon salt
- 4 cups water (for boiling)
- 1 star anise
- 1 cinnamon stick
- 2-3 pieces dried orange peel
- 1 teaspoon sugar
Garnishes and Additional Items
To enhance the flavor and presentation of our Tiger Eggs, we’ll add a few garnishes and other items that complement the dish perfectly.
- Chopped green onions (for garnish)
- Sesame seeds (for garnish)
- Chilli flakes (optional, for added heat)
- Mayonnaise or your favorite sauce (for serving)
Necessary Equipment
Embarking on the journey to make Tiger Eggs, it’s crucial to have the right tools on hand to bring this visually stunning and flavorful dish to life. Let’s dive into the essential equipment you’ll need to create those beautiful marbled patterns and infuse the eggs with their unique taste.
Pots and Pans
First and foremost, you’ll need a saucepan large enough to comfortably fit the eggs you plan to cook. This will ensure even cooking and ample space for the marbling agents to work their magic. Additionally, a non-stick skillet might come in handy if you decide to give the Tiger Eggs a quick sear for an extra layer of texture before serving.
Measuring Tools
Accuracy is key in creating the perfect balance of flavors. You’ll need measuring cups and spoons for precise amounts of water, soy sauce, and spices. This precision ensures the eggs are not too salty nor too bland, hitting the sweet spot of savory goodness.
Utensils
A slotted spoon is indispensable for gently placing the eggs in boiling water and removing them once they’re done, minimizing the risk of cracks and ensuring they stay intact for the marbling process. For the marbling itself, a fork or small knife is crucial for carefully cracking the eggshells to create those tiger-stripe patterns.
Containers
Once the eggs are cooked and cracked, they need to soak in the flavor-infused tea and soy mixture. A glass or plastic container with a tight-fitting lid is perfect for this stage, allowing the eggs to be fully submerged and evenly seasoned throughout.
Strainer or Cheesecloth
To remove the black tea leaves and any other large spices from the marinade before soaking the eggs, you’ll need a fine-mesh strainer or cheesecloth. This ensures a smooth, clear liquid for the eggs to bathe in, keeping the focus on the intricate patterns without any stray bits sticking to the eggshells.
Armed with these tools, we’re ready to take on the Tiger Eggs recipe. Each piece of equipment plays a pivotal role in achieving the dish’s signature look and taste, ensuring a delight for both the eyes and the palate.
Preparing the Ingredients
Before diving into creating this eye-catching and flavorful masterpiece, let’s get all our ingredients ready. Proper preparation is the key to making our Tiger Eggs not just visually appealing but also delicious.
Boiling the Eggs
First off, we’ll start by boiling the eggs. It’s crucial to get this step right to ensure the eggs are cooked perfectly for the marbling effect. Here’s how we’ll do it:
- Fill a medium-sized pot with enough water to cover the eggs and bring it to a boil over high heat.
- Using a slotted spoon, gently lower the eggs into the boiling water to prevent them from cracking.
- Reduce the heat to a simmer and let the eggs cook for 9 minutes. This timing ensures the yolks are fully set but not overly hard.
- Once done, use the same slotted spoon to transfer the eggs into a bowl of ice water. Cooling the eggs stops the cooking process and makes peeling easier.
- After the eggs have cooled for about 5 minutes, gently crack their shells by rolling them on a hard surface. However, do not peel them yet. The cracked shells are what give the Tiger Eggs their unique marbled appearance.
Preparing the Garnishes
While the eggs are cooling, we’ll prepare the garnishes. Garnishing not only adds to the presentation but also enhances the flavor:
- Finely chop the green onions. You’ll want a sharp knife to get clean cuts without bruising the delicate onions.
- Toast the sesame seeds by heating them in a small, dry pan over medium heat. Stir constantly until they turn golden brown and release their aroma, about 2 to 3 minutes.
- If using, crush the chili flakes slightly to release more of their spice.
These garnishes, along with the mentioned servings of mayonnaise or your preferred sauce, are the finishing touches that will elevate the Tiger Eggs, making them a delight for both the eyes and the palate.
Crafting the Tiger Stripes
Creating the tiger stripes is an essential part of making Tiger Eggs, transforming ordinary boiled eggs into a visually stunning centerpiece. This step involves careful preparation and application to achieve the marbled effect that resembles a tiger’s coat.
Mixing the Coloring
To begin, we need to prepare the coloring mixture. Gather your ingredients: black tea leaves, soy sauce, and your choice of spices. For a rich and deep color, we recommend using about 2 tablespoons of black tea leaves, 1/4 cup of soy sauce, and a mixture of spices such as star anise, cinnamon, and a dash of sugar to balance the flavors.
Combine these in a medium-sized pot and add about 2-3 cups of water, or enough to fully submerge the eggs. Bring this mixture to a simmer over medium heat, allowing the flavors to meld together for about 10-15 minutes. This step not only infuses the liquid with a robust flavor but also ensures that our eggs will have that perfect golden-brown hue with deeper brown stripes, mimicking the tiger-like appearance we’re aiming for.
Applying the Stripes
Once your coloring mixture is ready and still warm, it’s time to add the eggs. Gently place the previously boiled and cracked eggs into the pot. The cracks in the eggshells are crucial as they allow the coloring mixture to seep in, creating the signature stripes.
Simmer the eggs in the mixture for about 20-30 minutes on low heat. The longer you leave the eggs in the liquid, the more pronounced and darker the stripes will become. We find that this time frame allows for a beautiful contrast between the lighter areas protected by the shell and the stripes, achieving that distinctive tiger stripe effect.
After simmering, remove the eggs with a slotted spoon and plunge them into cold water. This stops the cooking process and makes peeling easier. Once cooled, gently peel the eggs to reveal the tiger stripes. The contrast between the soft, creamy yellow of the egg and the dark stripes is not only beautiful but adds a deliciously subtle layer of flavor from the tea and spices.
Enjoy your Tiger Eggs as a unique addition to any meal, garnished with green onions, sesame seeds, and perhaps a sprinkle of chili flakes for a spicy kick.
Assembling the Tiger Eggs
Now that we’ve crafted our tiger stripes to perfection, it’s time to bring these visually stunning Tiger Eggs to the table. Assembling them with care will ensure they look as good as they taste!
Arranging on Serving Platter
To start, we carefully select a platter or dish that complements the aesthetic of our Tiger Eggs. A dark, flat platter works wonderfully, as it highlights the marbled patterns and makes the colors pop. We arrange the eggs gently, ensuring each one has its moment to shine. Spacing them out evenly allows for easy access and prevents any from being hidden in the crowd.
For a more dynamic presentation, we might nestle the eggs atop a bed of greens or finely sliced cabbage, which adds a fresh contrast to the rich colors of the eggs. This not only supports the eggs but also incorporates a fresh element into our presentation, making the dish more inviting.
Adding Final Touches
The final step in our assembly process is all about enhancing the visual appeal and flavor. We delicately sprinkle toasted sesame seeds and thinly sliced green onions over the top of our Tiger Eggs. This not only adds a pop of color but also introduces a subtle crunch and fresh flavor that complements the savory taste of the eggs.
For those who enjoy a bit of heat, a light scattering of chili flakes can be a game-changer. It introduces a vibrant red hue that stands out beautifully against the dark patterns of the eggs and brings a warm, spicy kick that balances the dish’s flavors.
And finally, for an added touch of elegance, a small bowl of mayonnaise or a preferred dipping sauce can be placed on the side of the platter. This allows guests to customize the intensity of flavors to their liking, making each bite a personalized experience.
Through these steps, we ensure our Tiger Eggs are not only a delight to the palate but also a feast for the eyes, perfectly assembled on the platter, ready to impress and satisfy our guests.
Serving Suggestions
When it comes to bringing our Tiger Eggs recipe from kitchen to table, presentation plays just as crucial a role as the cooking process itself. After meticulously crafting the marbled effect that gives these eggs their tiger-like appearance, finding the perfect way to serve them is key to making the dish shine both aesthetically and taste-wise. Here, we detail our top serving suggestions to ensure your Tiger Eggs are not only a feast for the eyes but also tantalize the taste buds of everyone who tries them.
On a Bed of Greens
Arrange the Tiger Eggs on a fresh bed of mixed greens. This not only adds a pop of color to your plate but also introduces a crisp texture that contrasts beautifully with the softness of the eggs. A light drizzle of sesame oil and a sprinkle of sea salt can elevate the greens, making this pairing simple yet sophisticated.
As a Bento Box Component
For those who enjoy the art of Japanese bento boxes, Tiger Eggs make an exceptional addition. Pair them with steamed rice, pickled vegetables, and a small portion of grilled fish or tofu. The combination of flavors and textures turns an ordinary lunch into an extraordinary culinary delight.
With Asian-Inspired Slaw
Combine shredded cabbage, carrots, and a handful of sliced green onions to create a vibrant slaw that pairs wonderfully with the savory notes of the Tiger Eggs. A dressing made from rice vinegar, a touch of honey, and soy sauce ties the slaw together and complements the eggs beautifully.
Alongside Noodle Dishes
Serve Tiger Eggs alongside your favorite noodle dishes, such as ramen, soba, or udon. The richness of the eggs pairs delightfully with the umami flavors of broth-based noodles, adding depth and a visually striking element to your bowl.
With Toast for Breakfast
For a more Western approach, serving Tiger Eggs with a slice of thick, crusty toast is a fantastic option. Spread a thin layer of mayonnaise or a drizzle of spicy Sriracha mayo over the toast, then top with sliced Tiger Eggs. This simple yet satisfying breakfast or brunch option brings out the nuanced flavors of the eggs, making it an instant favorite.
Make-Ahead Tips
To keep the momentum going and ensure that our Tiger Eggs not only dazzle the eyes but also delight our taste buds without a rush, we have some make-ahead tips that’ll make assembling these beauties a breeze. Let’s dive in!
Prepping the Eggs
First things first, boiling and marbling the eggs can easily be done in advance. Simply follow the initial steps by boiling your eggs until they’re just firm, then gently crack their shells without peeling them off. Soak the eggs in the marbled mixture overnight. This step can be done up to 2-3 days ahead, ensuring the flavors fully penetrate the eggs, creating a more intense marbled effect. Once ready, keep them in the refrigerator until it’s time to peel and serve.
Crafting the Marbled Effect
Creating that stunning marbled effect is a highlight of this dish. After cracking the shells and soaking the eggs in the marbling mixture, storing them in a tight-seal container in the fridge will preserve the marbling liquid and ensure it stays potent. If you’re using soy sauce or any colored liquid, ensuring the eggs are fully submerged will guarantee an even coating. This step infuses the eggs with a delightful depth of flavor and that signature intricate pattern.
Serving and Garnishes
For those who plan to elevate their Tiger Eggs with exquisite garnishes or incorporate them into a larger meal, preparing your accompaniments ahead of time is key. Chop your greens, prep your Asian-inspired slaw, or ready your toast slices a day in advance and store them appropriately. This way, assembling the dish for breakfast or as part of a bento box will be effortless, keeping your morning routine or meal prep as streamlined as possible.
Embracing Versatility
Remember, Tiger Eggs are a versatile component that can be tailored to many meals. Whether you’re serving them on a lush bed of greens for a light, nutritious start to the day or slicing them as a hearty addition to noodle dishes, having your ingredients ready and your eggs marbled ahead of time will simplify the process. This make-ahead approach not only saves time but also enhances the flavors, making your Tiger Eggs the star of any meal.
Conclusion
We’ve shared our secrets to creating the stunning Tiger Eggs and how to make them a standout feature at any meal. Remember, the beauty of this dish lies not just in its appearance but also in the flexibility it offers. Whether you’re planning a fancy brunch or looking for a way to spice up your dinner table, Tiger Eggs are sure to impress. So go ahead and give it a try—experiment with different flavors and find your perfect match. We can’t wait to hear about the creative pairings you come up with!
Related Posts:
- Ultimate Guide to Asian Seafood Boil: Ingredients, Serving Tips & More
- Ultimate Guide to Making the Perfect Vietnamese Sardine Sandwich
- Ultimate Guide to Chạo Tôm: Preparation, Cooking, and Storage Tips
- Easy Shumai Dumpling Recipe: From Prep to Plate, Plus Storage Tips
- Ultimate Guide to Vietnamese Chicken Porridge: Prep, Cook & Serve
- Ultimate Guide: How to Clean Cockles Quickly & Safely
- Ultimate Guide to Making Italian Naan Bread: Tips & Tricks
- Ultimate Guide to Making Perfect Kimchi Egg Rolls
- Easy Mason Jar Pho: Quick, Customizable, and Delicious Recipe
- Ultimate Guide to Making and Storing Vietnamese Pickled Eggplant
- Easy Tiger Eggs Recipe: Create Stunning Marbled Eggs at Home
- Easy Baked Lobster Tails with Garlic Butter Recipe
- Ultimate Guide to Vietnamese Grilled Oysters: Tips & Serving Ideas
- Yellowtail with Jalapeno: Ultimate Guide to Prep, Store & Reheat
