
We’ve always been fascinated by the flavors and stories behind dishes from around the world, and today, we’re diving into the warm, buttery world of Pâte Chaud. This delightful pastry, with its roots in French cuisine, has found a special place in Vietnamese bakeries and hearts, blending the best of both culinary traditions.
Pâte Chaud, or Bánh Patê Sô in Vietnamese, is essentially a flaky, savory puff pastry filled with a rich, seasoned meat filling. It’s the perfect example of how food can evolve and adapt, crossing borders and becoming a beloved snack or appetizer. Whether you’re a seasoned baker or new to the kitchen, we’re excited to share our take on this exquisite pastry. Let’s embark on this culinary adventure together, and bring a taste of Vietnam right into your kitchen.
Ingredients
Join us as we dive into the delightful process of making Pâte Chaud, blending the flakiness of French pastry with the savory fill of Vietnamese cuisine. Gather your ingredients, and let’s embark on this culinary journey together.
For the Pate Chaud Pastry
- 1 package puff pastry sheets (thawed if frozen)
- 1 large egg (for egg wash)
- 2 tablespoons of water
- 1 pound ground pork
- 1 small onion, finely chopped
- 2 cloves garlic, minced
- 1 tablespoon fish sauce
- 1 tablespoon soy sauce
- 1 teaspoon sugar
- 1/2 teaspoon black pepper
- 1/4 cup cilantro, finely chopped
- 1/4 cup green onions, sliced
- 1 egg, beaten
Tools and Equipment Needed
To craft the perfect Pâte Chaud, having the right tools and equipment is just as crucial as having all the ingredients ready. We’ve compiled a list of essentials that will make the preparation process smoother and ensure your pastry comes out looking and tasting fantastic. Here’s what you’ll need:
- Rolling Pin: Essential for rolling out the dough to the perfect thickness, ensuring a flaky, light pastry.
- Baking Sheet: A flat surface where your Pâte Chaud will bake and golden to perfection.
- Parchment paper: To line your baking sheet, ensuring your pastries don’t stick and allowing for easy cleanup.
- Pastry Brush: For evenly spreading the egg wash over each Pâte Chaud, giving them that beautiful golden sheen.
- Large Mixing Bowl: For mixing your savory meat filling, ensuring all flavors are well combined.
- Sharp Knife or Pastry Cutter: To cut your dough into precise circles or squares, depending on your preference.
- Fork: To crimp the edges of your pastry, securing the filling inside and creating a decorative edge.
- Measuring Cups and Spoons: Accuracy is key in baking, so make sure to measure your ingredients correctly for the best results.
With these tools and equipment at hand, we’re well on our way to creating delicious Pâte Chaud that’ll transport your taste buds straight to Vietnam.
Make-Ahead Instructions
Crafting Pâte Chaud, with its delicate blend of flaky pastry and rich, savory filling, may seem like a day-of endeavor. However, we’ve got some tips for you on how to prepare this delightful pastry ahead of time, ensuring that your culinary experience is both smooth and enjoyable.
Preparing the Filling
The first step to making Pâte Chaud ahead is to prepare the filling. The filling can be made up to two days in advance. Here’s how:
- Follow the recipe to cook the filling, ensuring that any meat is thoroughly cooked and vegetables are tender.
- Once the filling is cooked, allow it to cool to room temperature. Then, transfer it to an airtight container.
- Refrigerate the filling until you’re ready to assemble the pastries. This not only enhances the flavors but also makes the assembly process easier, as the filling will hold its shape better when cold.
Freezing Assembled Pâte Chaud
For those who prefer to prepare the entire pastry in advance, freezing is an excellent option. Assemble the Pâte Chaud completely, but stop before the final baking step. Here’s how to freeze them properly:
- Assemble the pastries on a baking sheet lined with parchment paper, ensuring they don’t touch each other.
- Flash freeze the assembled pastries for about an hour, or until they’re firm.
- Once firm, transfer the pastries to a freezer-safe bag or container, separating layers with parchment paper to prevent sticking.
- Label the container with the freezing date, and store the pastries in the freezer for up to three months.
Baking from Frozen
When you’re ready to enjoy your Pâte Chaud, baking from frozen is straightforward:
- Preheat your oven to the temperature specified in the recipe. There’s no need to thaw the pastries beforehand.
- Place the frozen pastries on a parchment-lined baking sheet, and brush the tops with an egg wash to give them a beautiful golden sheen.
- Bake according to the recipe instructions, adding a few extra minutes to the baking time if necessary. Watch closely towards the end to ensure perfect golden perfection.
Following these make-ahead instructions will help you enjoy Pâte Chaud at your convenience, perfect for impressing guests or treating yourself to a delightful pastry without the need for day-of preparation.
Preparing the Filling
Getting the filling right is essential to the success of your Pâte Chaud. It’s where all the flavors meld together, creating that irresistible bite. We’ll guide you through cooking the meat perfectly and then seasoning it for that authentic taste.
Cooking the Meat
Begin by heating a large skillet over medium heat. Add 2 tablespoons of vegetable oil, swirling to coat the surface of the pan. Once hot, introduce 1 pound of ground pork (or your choice of meat) to the skillet. Break the meat apart with a wooden spoon, ensuring it cooks evenly. Cook until the meat is no longer pink, about 5 to 7 minutes.
As the meat cooks, finely chop 1 medium onion and 2 cloves of garlic. Add these to the skillet once the meat has browned. Continue to cook, stirring frequently, until the onions have softened and become translucent, about 3 to 5 additional minutes.
Seasoning and Cooling
Now that the meat and aromatics are fully cooked, it’s time to season the mixture. Add 1 tablespoon of soy sauce, 1 teaspoon of fish sauce, 1/2 teaspoon of black pepper, and 1 teaspoon of sugar to the skillet. Stir well to combine, ensuring every bit of meat is coated in the seasoning. Allow the mixture to cook for an additional 2 minutes, then remove from heat.
Transfer the meat filling to a bowl. Let it cool to room temperature. Once cooled, cover the bowl with plastic wrap and place it in the refrigerator. Chill the filling for at least 1 hour or until it’s cold. This step is crucial as it makes the filling easier to handle when assembling the Pâte Chaud, ensuring the flavors have time to meld together perfectly.
By following these steps, your Pâte Chaud filling will not only taste great but will also have the ideal consistency for stuffing into your pastry, ensuring a deliciously flaky and savory pastry every time.
Making the Pastry
After meticulously preparing the savory filling, it’s time to focus on crafting the perfect pastry that envelops the rich flavors of our Pâte Chaud. Creating a flaky and buttery casing is essential for the ultimate pastry experience.
Mixing the Dough
For the dough, you’ll need the following ingredients, ordered as they are used in the recipe:
- 2 cups of all-purpose flour
- 1 teaspoon of salt
- 2 sticks (1 cup) of cold unsalted butter, cut into small pieces
- 4-6 tablespoons of ice water
To begin, combine the all-purpose flour and salt in a large mixing bowl. Stir them together until they are well mixed. Next, add the cold, unsalted butter pieces to the bowl. Using a pastry blender or your fingertips, quickly work the butter into the flour until the mixture resembles coarse, pea-sized crumbs. This is the secret to a flaky crust: the bits of butter steam as they bake, creating little pockets in the pastry.
Gradually sprinkle the ice water over the flour and butter mixture, using just enough water to bring the dough together. Start with 4 tablespoons and add more, one tablespoon at a time, if the dough seems too dry. Gently mix until the dough starts to come together in a ball. Be careful not to overwork it; you want to ensure those butter pieces remain intact for maximum flakiness.
Chilling the Dough
Once your dough has formed, it’s crucial to let it rest. Divide the dough in half and shape each half into a disk. Wrap these disks tightly in plastic wrap. Chill in the refrigerator for at least 1 hour. This resting period allows the gluten in the dough to relax, which makes the pastry easier to roll out and helps prevent shrinking during baking. It also ensures the butter stays cold, which is key to achieving that delightfully flaky texture we’re aiming for.
Chilling the dough not only makes it easier to handle but also intensifies the flavors, as it gives time for the ingredients to meld together harmoniously. After the dough has chilled and relaxed, it’s ready to be rolled out and filled with the delicious meat mixture we prepared earlier, one step closer to enjoying the delightful Pâte Chaud.
Assembling the Pate Chaud
Now that we have our flavorful meat filling chilled and our pastry dough rolled out and ready, it’s time to bring them together to form our delicious Pâte Chaud. Let’s walk through the steps to assemble these savory pastries, ensuring they’re perfectly crafted for baking.
Cutting the Pastry
First up, we’ll need to cut our pastry. Ensure your dough is rolled out on a lightly floured surface to prevent sticking. Using a round cutter or a small bowl with a sharp edge, cut out circles of dough. For standard-size Pâte Chaud, a cutter about 4 inches in diameter works well, but you can adjust based on your preference for larger or smaller pastries. If the dough warms and becomes sticky while you’re working with it, pop it back in the fridge for a few minutes to firm up. This ensures it retains that desirable flaky texture during baking.
Filling the Pastry
Once our pastry circles are ready, it’s time to add the filling. Place a tablespoon of the chilled meat filling into the center of each dough circle. Be mindful not to overfill; leaving enough space around the edges is crucial for a good seal. If you find yourself tempted to add just a bit more filling, remember that overstuffed Pâte Chaud can burst open during baking, which might let those delicious juices escape.
Sealing the Pastries
Let’s seal our pastries. Moisten the edges of the dough circles with a little water to help them stick together. Fold the dough over the filling, pressing the edges together to form a half-moon shape. Use a fork to crimp the edges securely, ensuring the filling is snugly encased with no gaps for leakage. This not only helps with sealing but also adds a decorative touch to the edges of your Pâte Chaud. Remember, a tight seal is the secret to keeping all that flavorful filling inside where it belongs, making every bite as delicious as possible.
Once assembled, our Pâte Chaud are ready to be brushed with an egg wash, adding that beautiful golden color and shine when they come out of the oven. But that’s a step for our next section. For now, let’s take pride in our assembled pastries, anticipating the flaky, savory delights we’re about to enjoy.
Baking the Pate Chaud
Now that our Pâte Chaud is assembled and ready, it’s time to turn these prepped pastries into golden, flaky delights. Let’s walk through the final steps to ensure they come out perfectly baked.
Preheating the Oven
Before we do anything else, let’s preheat the oven to 375°F (190°C). A properly heated oven is crucial for baking Pâte Chaud, as it ensures the pastry puffs up nicely and turns golden brown. Make sure your oven rack is positioned in the middle, offering the best heat distribution for our pastries.
Egg Washing
With our pastries assembled on a baking sheet lined with parchment paper, we’ll give them a glossy finish. Beat one egg with a tablespoon of water to make an egg wash. Brush this mixture gently over the top and sides of each pastry. This will give the Pâte Chaud a beautiful golden sheen and help seal the edges further.
Scoring the Pastry
Scoring isn’t just decorative; it helps steam escape during baking, preventing the pastries from bursting at the seams. With a sharp knife, gently score the top of each pastry with two or three small slits. Be careful not to cut too deep – we’re not looking to slice them open, just to create vents for steam to escape.
Baking to Perfection
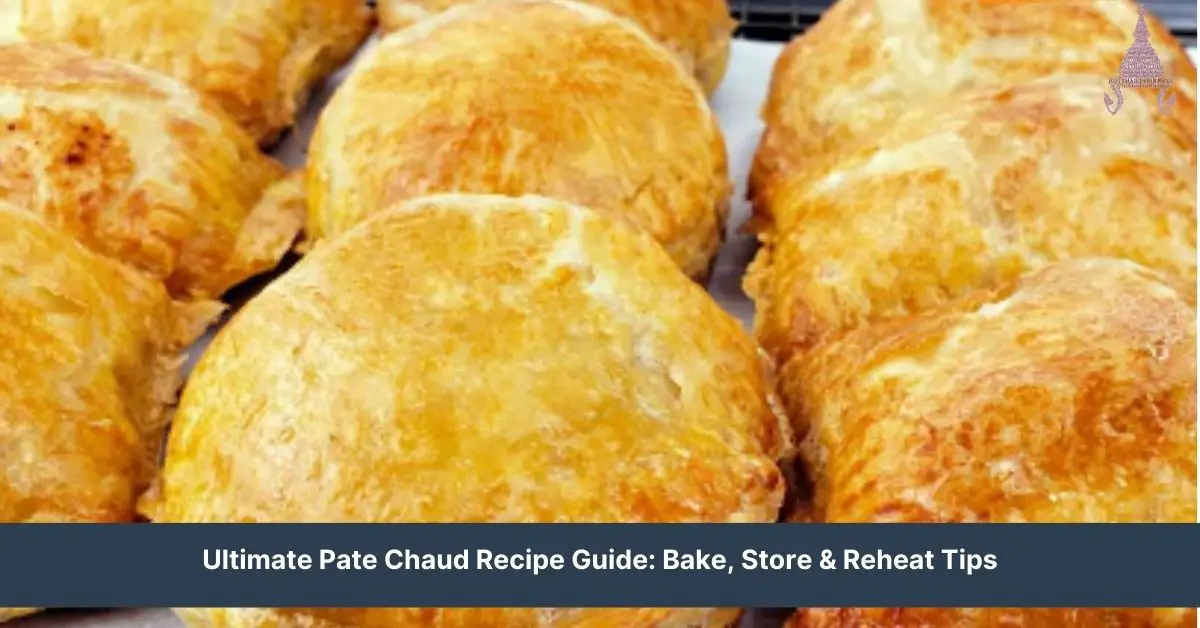
It’s time to bake! Place the baking sheet in the preheated oven and bake for about 25 to 30 minutes, or until the pastries puff up and sport a glorious golden brown color. Keep an eye on them after the 20-minute mark to ensure they don’t overbrown. Once baked to perfection, remove the Pâte Chaud from the oven and allow them to cool on the baking sheet for a few minutes before transferring to a wire rack.
Serving Suggestions
After lovingly preparing and baking your Pâte Chaud to golden perfection, the final step is to serve it in a manner that complements its wonderful flavors and textures. Serving Pâte Chaud is an art in itself, and we have some delightful suggestions to make the most out of this culinary experience.
Pairing with Sauces
Firstly, consider pairing your Pâte Chaud with a selection of sauces. A tangy dipping sauce, such as a homemade aioli or a light vinaigrette, can balance the richness of the pastry. If you prefer something with a bit more spice, a dollop of chili sauce or Sriracha can add a lovely heat that contrasts beautifully with the buttery pastry.
Side Dishes
For a more rounded meal, serve Pâte Chaud alongside fresh, simple side dishes. A crisp green salad dressed with a light vinaigrette offers a refreshing counterpoint to the savory pastries. If you’re leaning towards a heartier companion, a bowl of lightly seasoned broth or a clear soup can envelop your taste senses, marrying well with the flaky textures and savory fillings of Pâte Chaud.
Beverage Pairings
Choosing the right beverage to accompany Pâte Chaud can elevate your dining experience. For non-alcoholic options, a sparkling water with a slice of lime or a cup of aromatic tea can cleanse the palate between bites. If you’re indulging in alcoholic beverages, a crisp white wine, such as a Sauvignon Blanc, or a light-bodied beer complements the flavors without overpowering the delicate pastry.
Presentation Tips
Finally, the presentation plays a crucial role in enhancing the overall enjoyment of Pâte Chaud. Serve the pastries on a beautiful platter, garnished with fresh herbs for a touch of color. If you’ve prepared multiple types of fillings, consider labeling them so guests can choose according to their taste preferences. The visual appeal will set the stage for a memorable culinary journey with Pâte Chaud at the heart.
Storing and Reheating Leftovers
After exploring the wonderful fusion of flavors that Pâte Chaud brings to the table, it’s not uncommon to have a few pastries left over. Luckily, storing and reheating these savory treats can be done with ease, ensuring that they remain just as delicious the next day. Here’s how we can keep our Pâte Chaud tasting fresh.
Storing Pâte Chaud
When it comes to storing leftover Pâte Chaud, the goal is to maintain their flakiness and prevent the pastry from becoming soggy. Follow these steps to preserve their freshly-baked quality:
- Let Them Cool Down Completely: Before storing, allow the pastries to cool down to room temperature. This prevents condensation inside the storage container, which can make the crust soggy.
- Choose the Right Container: For short-term storage, place the Pâte Chaud in an airtight container. If you’re stacking them, separate layers with parchment paper to prevent sticking and keep the crust intact.
- Refrigerate or Freeze: For keeping them fresh for up to three days, the refrigerator is your best bet. If you’d like to store them longer, freezing is an excellent option. Pâte Chaud can be frozen for up to three months. Make sure to seal them well to avoid freezer burn.
Reheating Leftover Pâte Chaud
Reheating Pâte Chaud correctly is key to restoring their warm, flaky goodness. Here’s the best way to bring back that freshly-baked taste and texture:
- Preheat Your Oven: Set your oven to 375°F (190°C). The high heat helps to crisp up the pastry.
- Prepare the Pastries: If frozen, there’s no need to thaw the pastries before reheating. Directly transferring them from the freezer to the oven works fine.
- Reheat on a Baking Sheet: Place the pastries on a baking sheet lined with parchment paper. For refrigerated Pâte Chaud, heat for about 10 minutes. Frozen ones might take a bit longer, around 15-20 minutes.
- Check for Warmth: Ensure the middle of the pastry is warm and the crust is crispy. If not, heat for an additional few minutes.
Conclusion
We’ve explored the delightful world of Pâte Chaud together, uncovering the secrets to its flaky texture and savory fillings. From gathering the right tools to mastering the baking process, we’ve shared everything you need to create these delicious pastries at home. And let’s not forget the joy of pairing them with the perfect sauce, side, or drink to elevate your meal even further. Remember, if you’ve got leftovers, our tips on storing and reheating will ensure they’re just as good the second time around. So why not give it a try? We’re sure you’ll fall in love with the flavors and textures of this Franco-Vietnamese creation just as we have. Happy baking!
Related Posts:
- Top Best Vietnamese Coffee Brands: Ultimate Guide & Pairings
- Delight in Healthy French Vietnamese Cuisine: From Pho to Banh Mi
- How to Desalinate Corned Beef: Health Benefits & Techniques
- Ultimate Pate Chaud Recipe Guide: Bake, Store & Reheat Tips
- Ultimate New England Oyster Chowder Recipe & Storage Tips
- Mastering Hamachi Kama: Tips for the Perfect Grilled Yellowtail Collar
- Juicy Teriyaki Pork Belly Recipe: Easy Make-Ahead Tips & Serving Ideas
- Easy Cambodian Beef Jerky Recipe: Marinated & Oven-Baked
- Master Cambodian Noodle Dishes: From Prep to Plate
- Braised Beef Noodle Soup: The Ultimate Guide to Preparation and Storage
- Ultimate Guide to Kasoy Noodle Soup: Recipe, Storage & Reheating Tips
- Ultimate Laap Recipe Guide: From Prep to Perfect Serve
- Ultimate Tapioca Cookies Recipe: Tips for Perfect Texture & Flavor
- Ultimate Hot Cheetos Corn Dog Guide: Recipe, Storage, Reheating
